
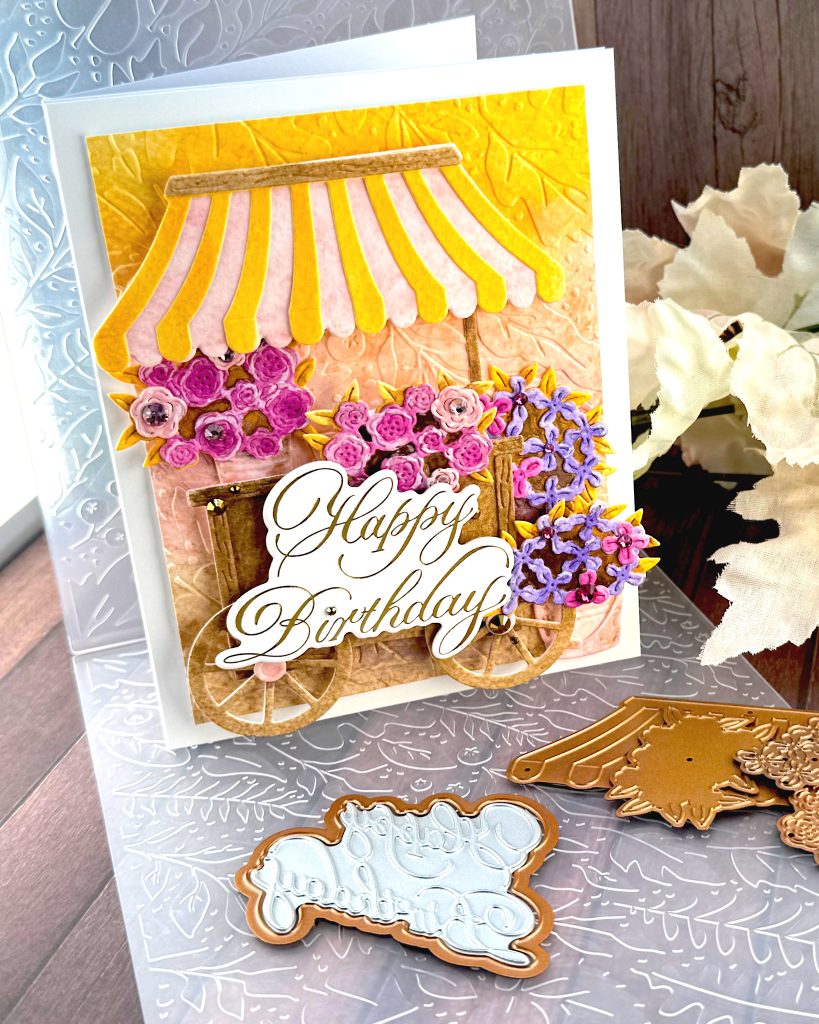
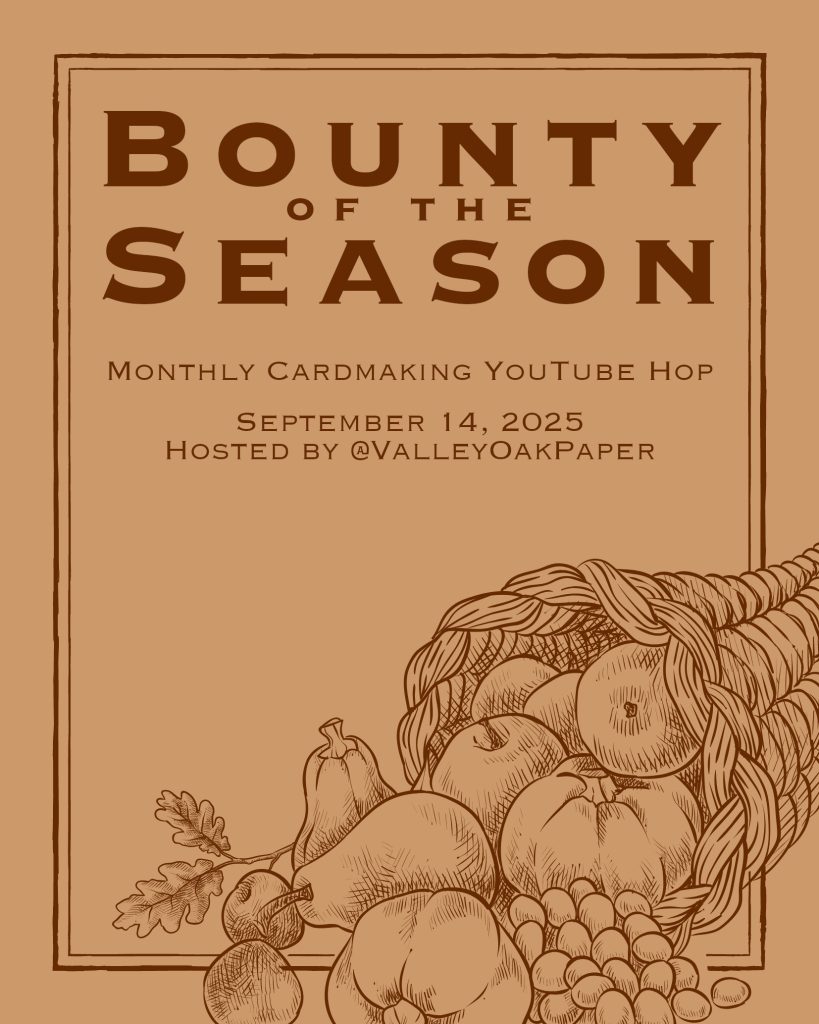
The theme of my monthly video hop is Bounty of the Season and my card is going to feature a flower cart in autumnal tones.
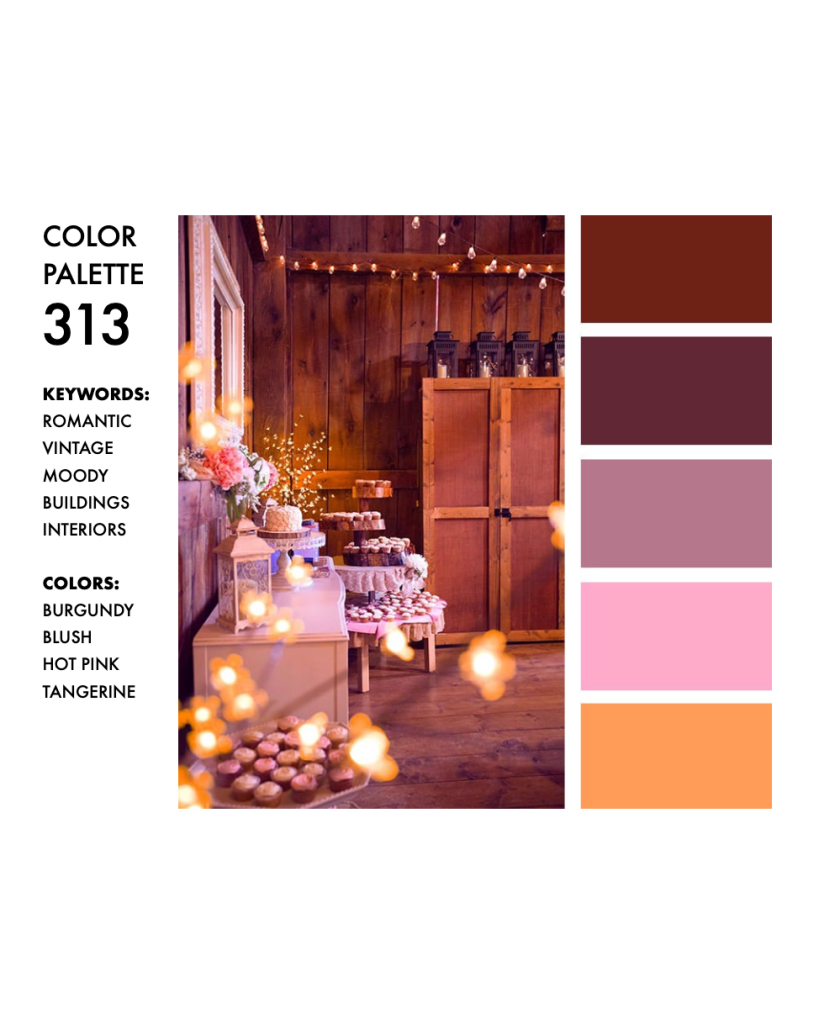
To add more interest I’m using my Distress Watercolor Pencils. The colors I’ve chosen were inspired by palette 313 in the Color Cube.
As you can see one of the colors is Ground Espresso (Set 4). I’m scribbling it all over a piece of watercolor paper. First I go over it quickly, with the pencil held on its side. Then I go over it more carefully with the pencil held upright to get into the valleys of the paper.
Then I hold the paper down on my surface with magnets and spray it with water from my Distress Sprayer. I use a flat brush to rub out the pigment.
I repeat the process with the other colors: Villainous Potion (set 1), Seedless Preserves (Set 2), Wild Honey (Set 3) and finally Kitsch Flamingo (Set 2).
I felt that I didn’t get enough of the pink color, so I added more by using the brush directly on the pencil.

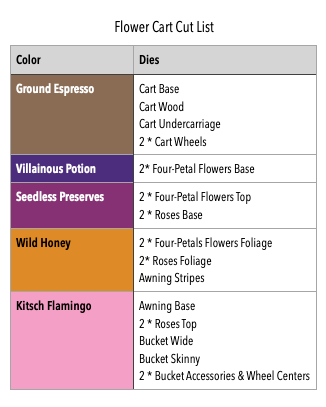
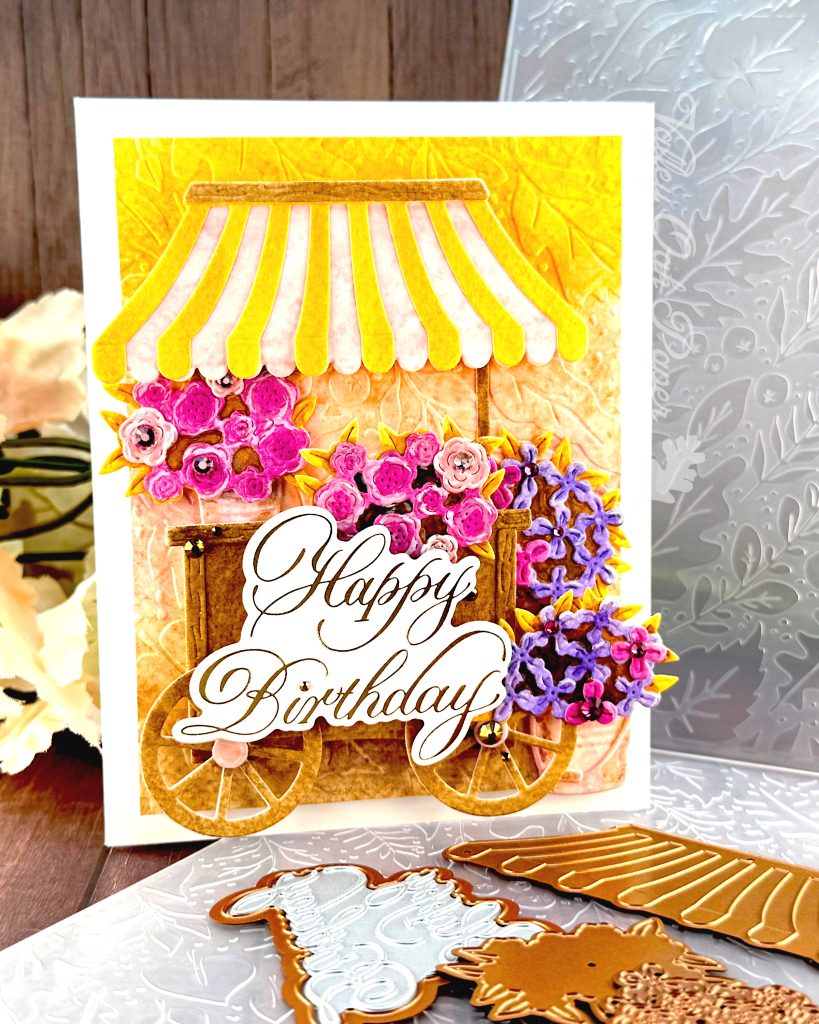
With my paper colored I can die cut all the parts for the flower cart. It’s a Spellbinders die set that came out earlier this year. Naturally I use Ground Espresso for the wooden parts of the cart.
The four-petal flowers I’m cutting from Villainous Potion and the top layer from Seedless Preserves. I’m cutting out the roses from Seedless Preserves and the top layer from Kitsch Flamingo. I’m also cutting the base of the awning and buckets from Kitsch Flamingo. Finally Wild Honey will be the base of the foliage and the awning stripes.
Gluing Together the Cart Parts
Now I have all the parts for the cart so I can get gluing!
This is the base of the cart. I’ve cut it out of Accent Opaque too, and now I’m stacking the die cuts for stability. I also add the top and sides. The under carriage goes behind the rest of the cart.
I’m adding the pink centers to the wooden wheels, but I’m not gluing the wheels to the cart right now. That’s because I haven’t decided on the layout yet.
I’m also stacking the base of the awning, so I can pop it up on foam tape. Then I add the awning stripes and finally the wooden top.
Then I’m gluing together flowers and foliage. I die cut the flowers and foliage twice to get a nice, full display.
I’m gluing a handle to a large bucket. I think I only used one wide and wide skinny bucket in the end.
Shading & Highlights on the Florals
Now I want to add some more detail to the flowers and buckets. I’m using some Ground Espresso to add shade between and around the flowers. I’m careful not to add too much water, or the glue will dissolve. I’m also adding shade to the sides of the buckets.
Here I’m adding Villainous Potion and Seedless Preserves to the flower centers. Then I’m creating highlights with Kitsch Flamingo and white acrylic paint.
Watercolored & Embossed Background
I’m going to need the background to lay out the cart on. For this I’m using three of the colors from the cart, Ground Espresso, Wild Honey and Kitsch Flamingo. I’m letting them dry naturally, so that the colors will blend more.
Then I run the paper through a gorgeous embossing folder called Autumn Breeze. It’s Spellbinders Embossing Folder of the Month for September. The paper is still a little damp but I spray a bit more water to get more even results.
And this is the result. This is such a pretty folder!
I’ve cut down the background to 3 ¾ by 5”. Now I’m layering a slightly smaller piece of Accent Opaque behind it.
This yellow foam is from the Dollar Store. I like it because it’s so thin. I glue it to the back of my embossed panel.
I buy card bases, but I don’t like the color. It’s too grey. So I always glue a Hammermill panel to the front. Here I’m gluing the background to the card base.

Copperplate Foiled Sentiment
I’m also going to need a sentiment. For that I’m going to foil the Copperplate Happy Birthday from this Spellbinders set. I like it because it includes dies for both sentiments.
So I’m turning on my well-loved Glimmer machine. Moving it to the side, so I can cut the foil. I’ve chosen Polished Brass, because I think it goes well with the Wild Honey. I’m cutting it with my Olfa rotary trimmer and taping it to a piece of Hammermill. Then the light turns green and I press the button and put the sentiment on the silicone surface. When the second light turns steady green, I take the Glimmer platform and my foil sandwich to my Spellbinders Platinum 6.
And this is the result! Isn’t it just stunning! I love the copperplate series. So elegant!
For die cutting it, I’m using my little Scout. Ever since I taped together the platform with double-sided tape, I’m using it much more. Sorry Sidekick! I’m cutting out a second layer from Accent Opaque, because I’ll likely want to pop up the sentiment. Then I glue them together.
Assembly
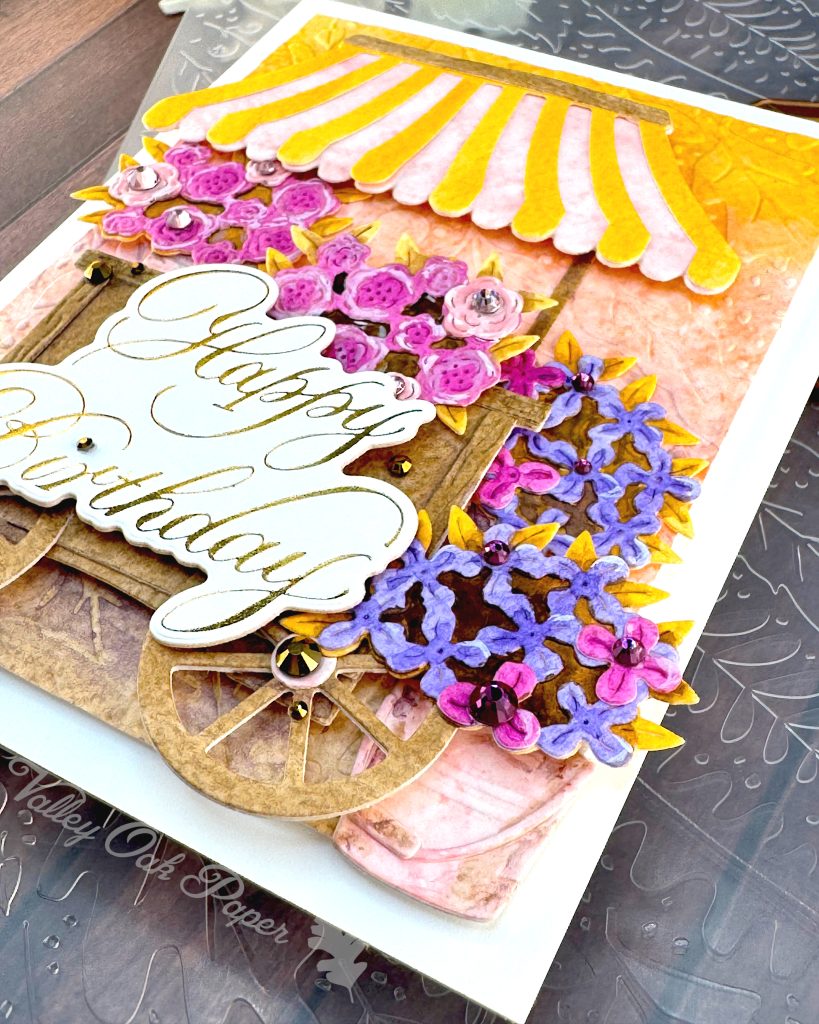
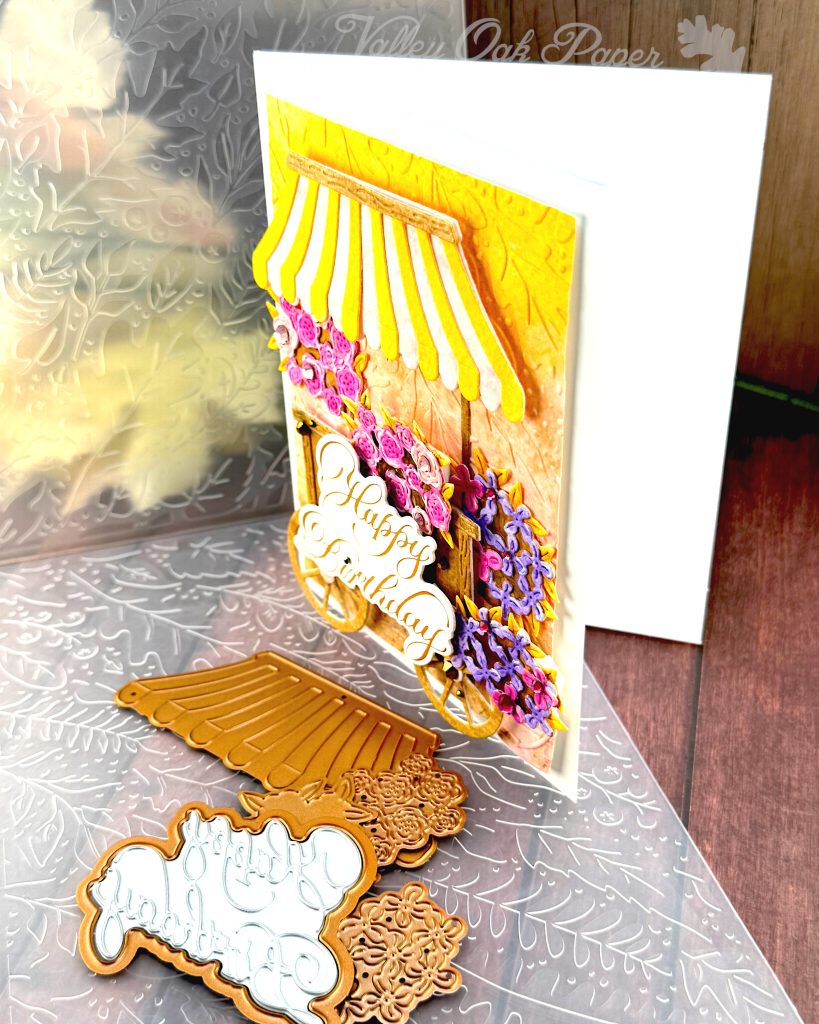
Now I have all the components, so I can put together the card. I’ve added foam tape behind the awning and the body of the cart. First I glue down the awning, because it’s the widest part. Next I glue the two supports for the awning to the embossed panel. They should align left and right with the ends of the wooden beam at the top of the awning. Then I adhere the cart itself centered on the awning. Then I decide to glue the wheels to the cart. The wheel centers should sit right above the thickest part of the undercarriage. That’s where the wheel axis run.
I glue a wide bucket behind the right wheel. Then I add some Villainous Potion flowers. The part that’s on top of the wheel gets glued down and I add two layers of foam tape under the part that hangs free.
I cut off the bottom of a skinny bucket, to make it look as if it sits on the counter. Then I can glue it to the left awning support. I add some roses on top of the bucket, but under the awning.
My phone died, but I glued more Villainous Potion flowers behind and to the right of the cart. And the final rose die cut I’m letting spill down from the cart counter. I had to use double foam tape to support the top of that die cut.
Adding Depth with a Shadow Wash
I want to add some more depth to my composition, so I’m mixing Ground Espresso and Villainous Potion to use as a shadow wash. I’m adding some behind the popped up flowers to the right of the cart. Then a little bit behind the wheels. Also next to the textured die cuts on the cart to help them stand out more. And under the roses. And finally under the cart, so it stands out from the background.
I have put foam tape behind the sentiment and now I’m placing it on the cart. And here is the finished card. I added some Spellbinders Color Essentials Gems in Gold, Pink and Berry. You can see what a difference the last shadow wash made to the depth.
I hope that the abundance of flowers, fall colors and textures in this card remind you of the Bounty of the Season, the theme of my September video hop. Don’t forget to check out the other cardmakers in this month’s hop.
