
The product suite I’m using today is from Pinkfresh Studio and it’s called Poinsettia. I’m going to use the stamps, the washi tape, and the dies. This particular product is retired, but all Pinkfresh Washi Tapes are the same size. So you can use any washi for this card! I’ll link to them at the end of this blog post
The theme of my monthly video hop for November 2025 is Out of My Comfort Zone. For that I’ve chosen to create a fun fold. I don’t know what it is about them, but I have a problem with fun folds.
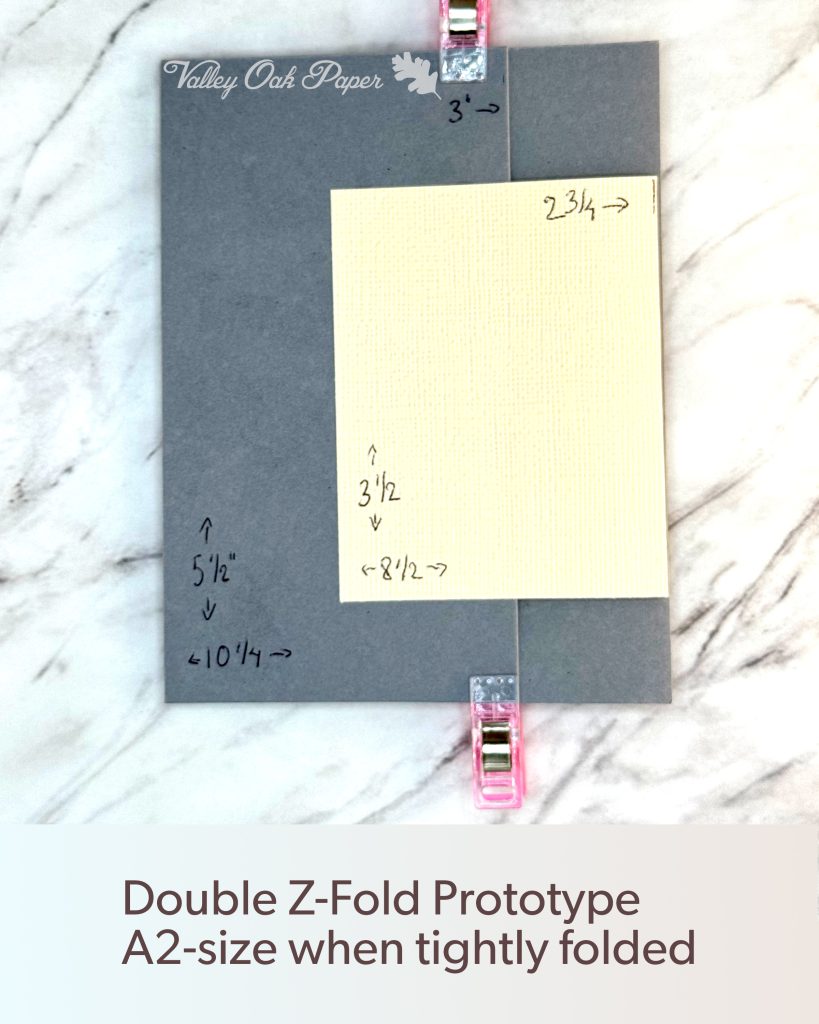
This is a prototype I created, based on a recent video by Jennifer McGuire. I will link to her video in the description below. As I said, fun folds are my Achilles heel and this prototype is not right. Don’t worry, I’ll put the right measurements in the video and in this blog post.
Large Z Fold
I’m going to use Kraft cardstock for the base. This piece is 5 ½” tall and 10 ¼” wide. The final card is going to be A2, so 4 ¼” by 5 ½”.
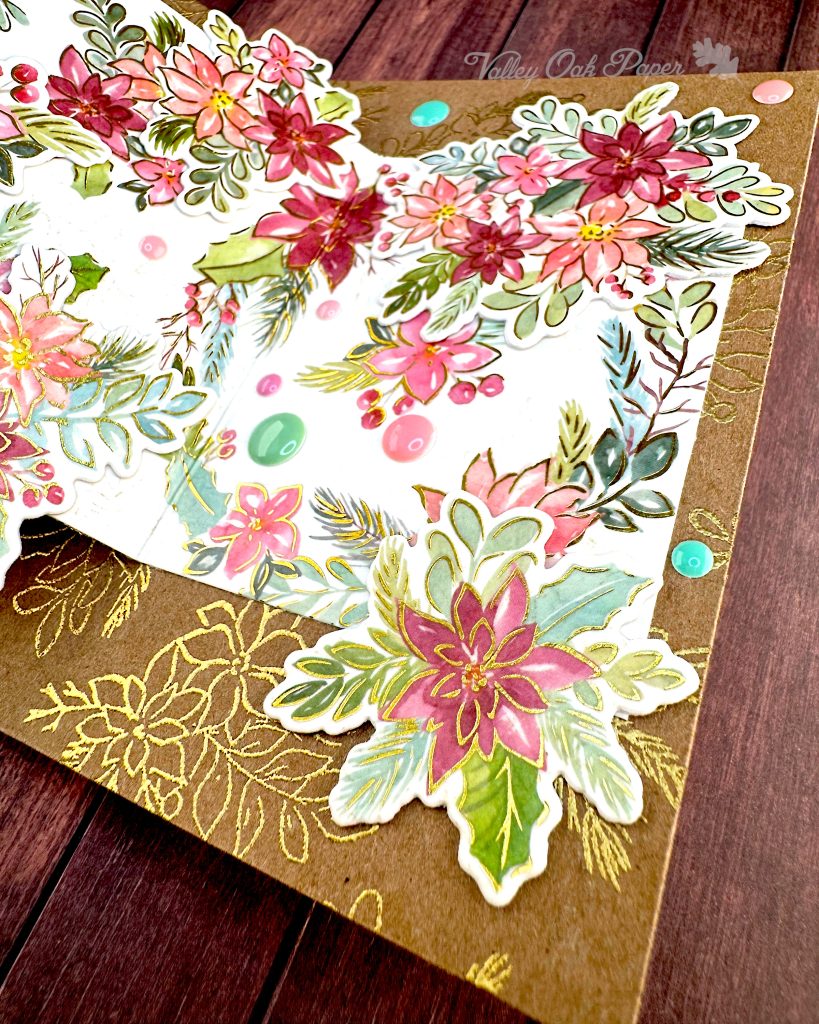
I’m going to use the big stamp with all the florals as a background stamp and create my own pattern paper. Here’s another piece of Kraft that I used to create swatches. The bottom swatch is Ranger Super Fine Detail in Gold. I tried a bunch of other colors, but I think the gold is the best match and it contrasts less with the Kraft. That’s good for a background. I don’t want it to get too busy.

I’m starting with the big stamp diagonally in my Misti. I’m using my anti-static powder tool and then I’m inking up the stamp with Versamark. You really have to press down hard on these large stamps to get all the detail. Just like a background stamp.
Then I’m pouring Ranger Super Fine Detail in Gold over the stamped images. And then I heat up the embossing powder with my Wagner heat tool.
To make it easier to fill up the whole cardstock piece, I’m moving the stamp to the outside of the lid of my Misti. I put the mousepad under the cardstock piece and stamp with Versamark. Then I pour embossing powder over the stamped images and melt it.
I continue filling out the whole piece of Kraft. And this is what it looks like in the end. So pretty!
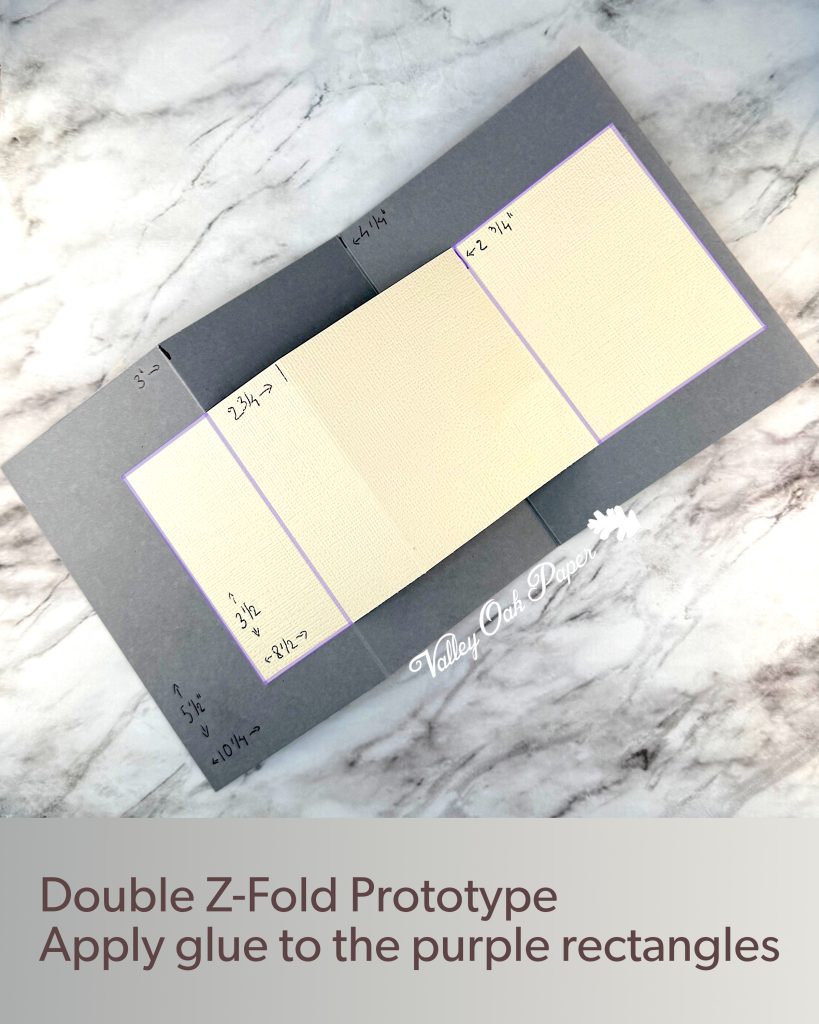

This is after I had scored the pretty Kraft cardstock and discovered that my prototype was off by half an inch. Here is a new prototype that actually produces an A2 card. Off camera I heat embossed a new piece of Kraft with the right dimensions.
Here I’m scoring it 3” from the left side. Then I bring out the prototype and I almost go with the wrong measurements. But I catch it in time. So I score 4 ¼” from the right side. That’s easy because it’s the short end of an A2 card, so I’ve marked it with a black Sharpie on my scoreboard.
Then I fold the first fold as a mountain fold and the second one as a valley, to give me a Z fold. Then I check one more time that the card really is 4 ¼ wide. Fun folds! Yay!
Washi Tape
Turning to the washi, I’m going to need two pattern repeats from it. One is going to be the small Z fold, the other one I’m going to die cut to decorate the card.
It’s pretty easy to use washi. You just unroll it and smooth it down on your cardstock. I use a box cutter to cut it off from the roll. Then I use my bone folder to smooth down the edges.
Small Z Fold
I’m cutting apart the two pattern repeats. This is going to be the small Z fold. Then I mark the edges with a pencil. The tape is 4” across and I need 3 ½”. So I need to remove about 1/4” from each long side. The length is about 8 ½, so I don’t need to cut off much from the short sides.
This Fiskar trimmer is good because the wire shows exactly where the cut will be. First I’m just trimming the cardstock to the width and length of the washi. Then I cut a bit more on the long sides.
I’m left with a piece that’s 8 ½ by 3 ½”, just like my prototype. And now I’m scoring it at 2 ¾” from each side.
Washi Die Cuts
Turning to the other washi pattern repeat, I’m going to die cut it. It’s one big die, so it’s pretty easy. I’m using my extended Anna Griffin plates, but you can fit the die diagonally on regular-size plates too. Here are the die cuts. This washi is so pretty!
I’m going to cut this die with Accent Opaque too. Here I’ve sorted the die cuts and I’m stacking Accent Opaque behind the pretty washi.
Hot Foiled Sentiment
For the sentiment I’m going to use this bold Pinkfresh Studio Joy. I picked it up when Creative Escape had their final in-person sale. I’m going to miss having a paper crafts store within driving distance.
This is Polished Brass Glimmer Hot Foil. I have several gold Glimmer rolls and this is the one that I felt looked the best with the gold in the washi and the heat embossing.
I’m taping it to a piece of Hammermill cardstock. My Glimmer machine is ready, so I can put the Joy plate on the silicone and press the timer button. The light is steady green, so I’m taking the Glimmer to my Platinum 6 and running it through.
I’m back and I’m immediately docking the Glimmer surface to the machine and putting my solid hot foil plate on it, so I can foil the negative. Then I remove the tape and we get that magical reveal. This is the moment that keeps me returning to Glimmer time and time again. Gorgeous!
I’m going to cut out the letters with the coordinating die. Wow, that turned out perfect! The O resisted a bit, but I got it out in the end.

Sentiment Stamping
One last piece of stamping before we can start assembling the card. This piece of Hammermill is 4” by 5 ¼”. It’s going to go on the back of the card for a personal message. I’m using anti-static powder first, so I won’t forget.
Then I take care to place the sentiment reasonably straight and centered. I pick up the stamp with the lid of my Misti. I ink it up with Versamark and stamp it down.
I pour gold heat embossing powder over the impression and while my heat tool warms up I remove stray embossing powder with a brush and a pokey tool. Then I heat up the powder with my heat gun.
Assembly
Now we have all the parts and can start putting together the card. I’m starting by applying the stamped panel for the personal message on the back, because that’s going to be hard to do later.
I used the negative foil image for the joy, but I prefer the positive. So I’m going to use the negative and white cardstock to stack behind the positive letters.
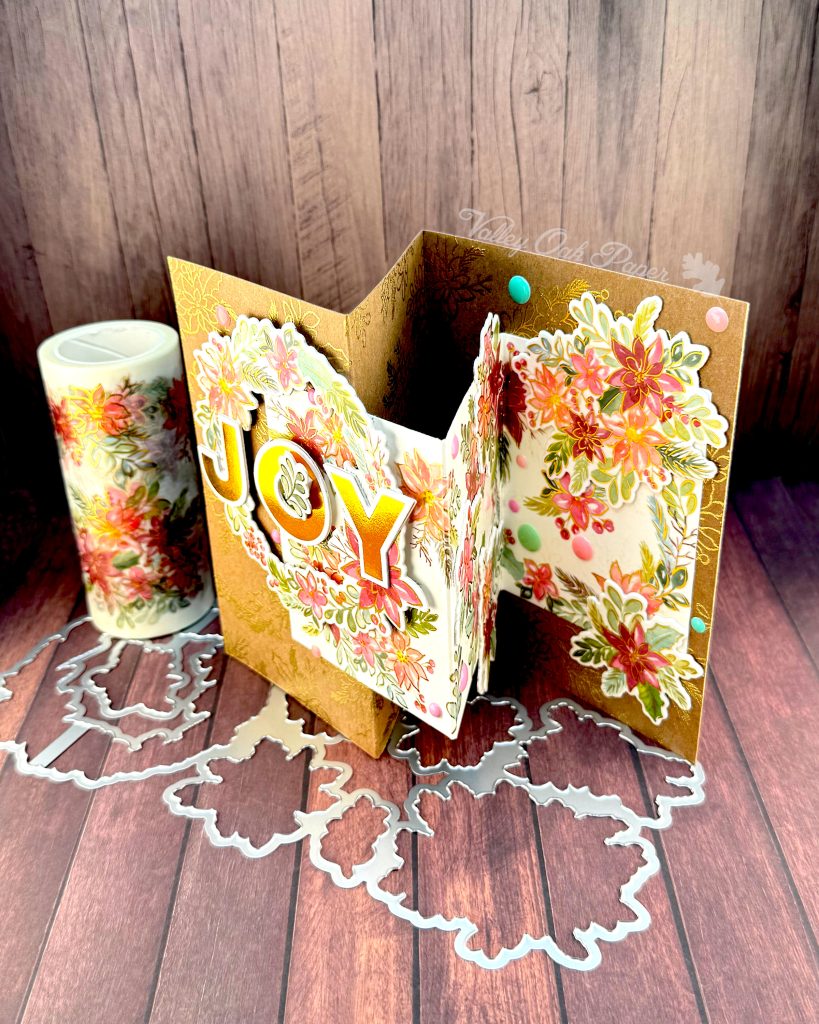
Gluing the Z Folds Together
Here I’m starting to glue together the fun folds. I’m starting with the back and aligning the right fold with the end of the back panel.
Then we glue together the two front panels. I put glue along the right edge of the large front fold and along the left edge of the smaller fold. Then I fold them down and put magnets on them while the glue dries.
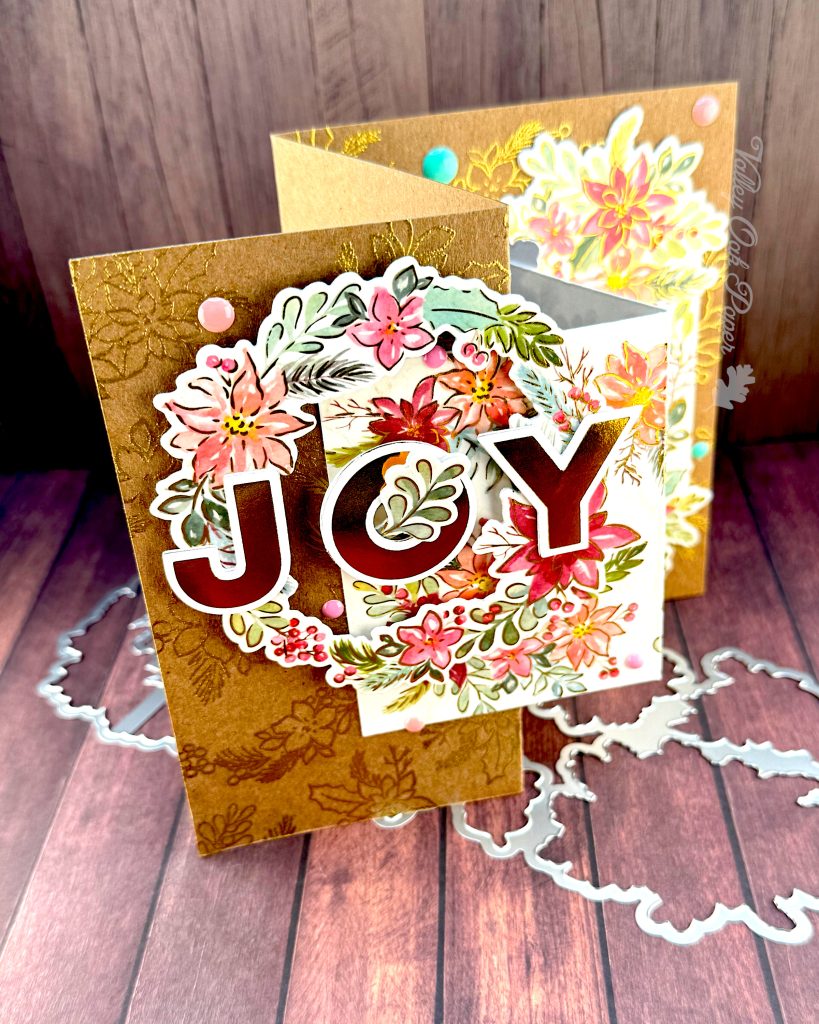
This is the result. Two Z folds that move together.
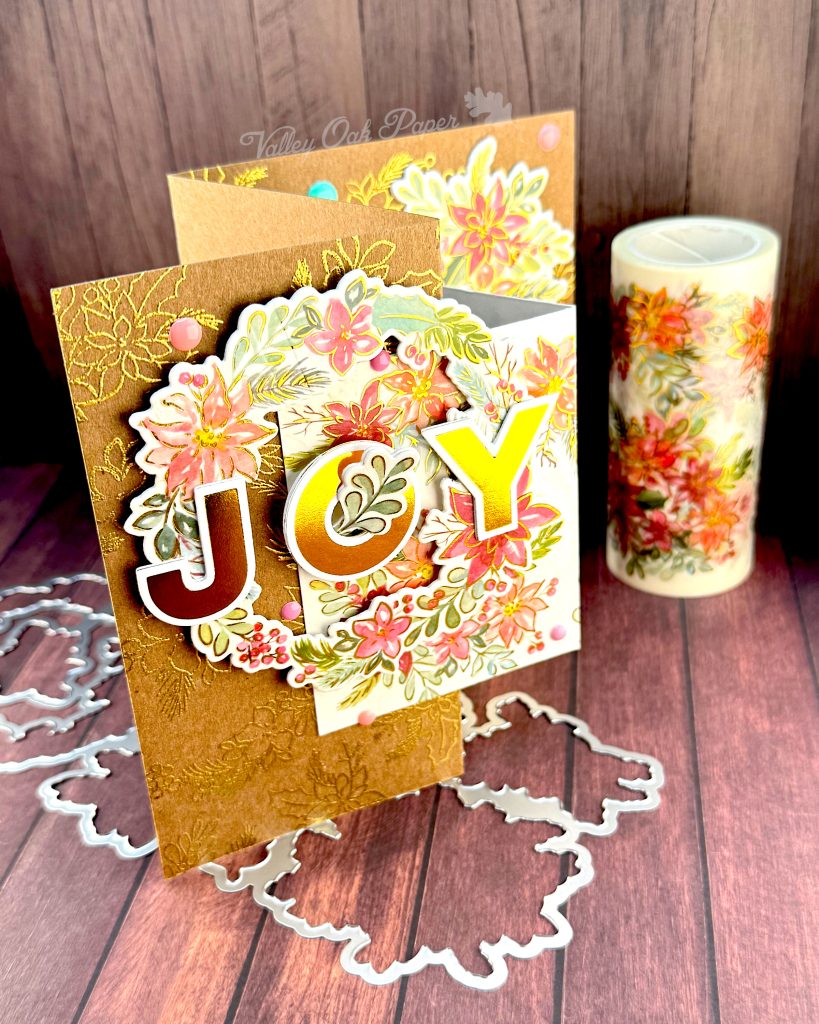
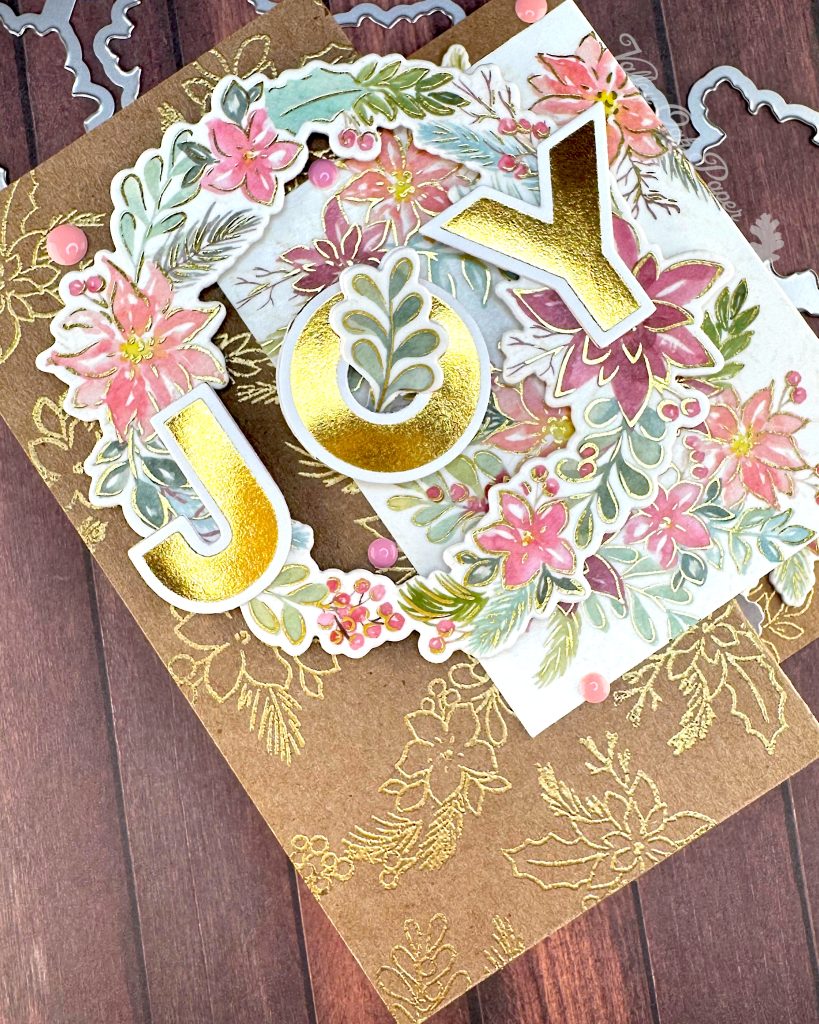
Decorating the Front of the Card
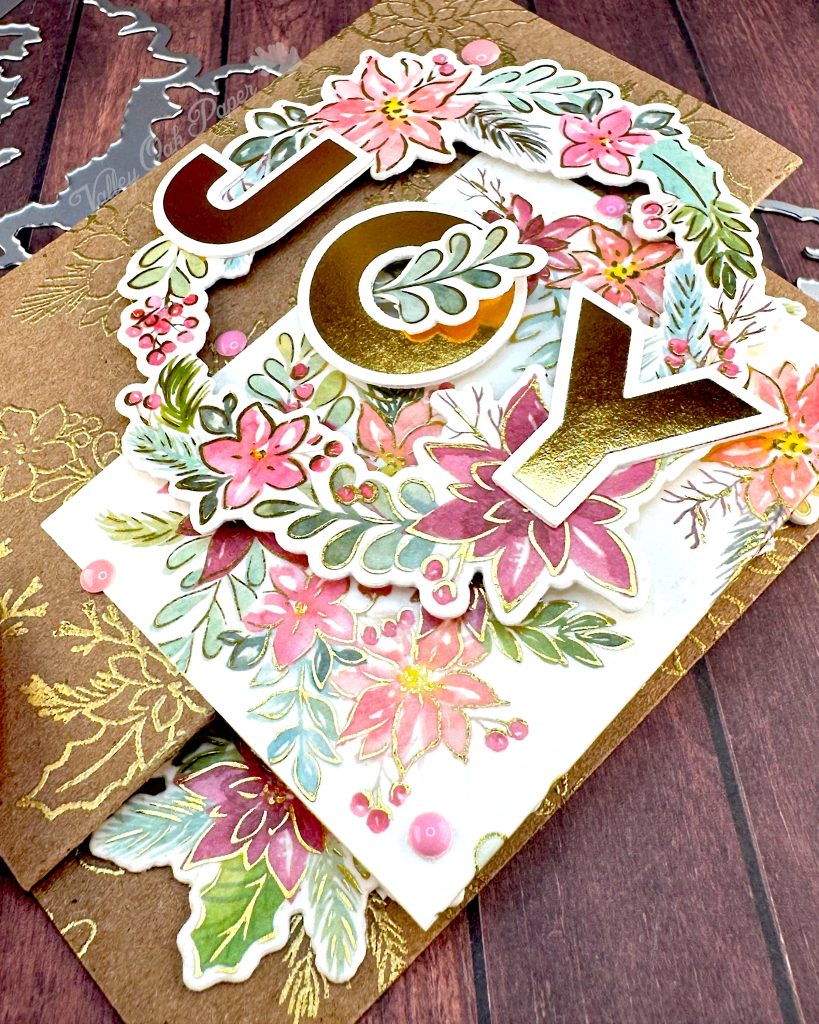
Now I can decorate the front of the card. For that I want to use the big wreath die cut and the sentiment. I’m putting foam tape behind the wreath. Then I’m gluing it down near the top center of the card.
Next I glue the J to the left side of the wreath. I also glue the Y to the right side. Then I use my T ruler to make sure the J and Y are lined up. That’s the advantage with gluing to washi tape – you get a lot of wiggle room.
I’m adding foam tape to the back of the O and then I use my T ruler again to line it up with the J and Y. I’m also adding a little sprig of greenery coming out of the center. I want it to look like the joy just can’t be contained, it’s even exploding out of the letters themselves.
Then I add a tiny bit of foam tape to hold the greenery in place on top of the O.
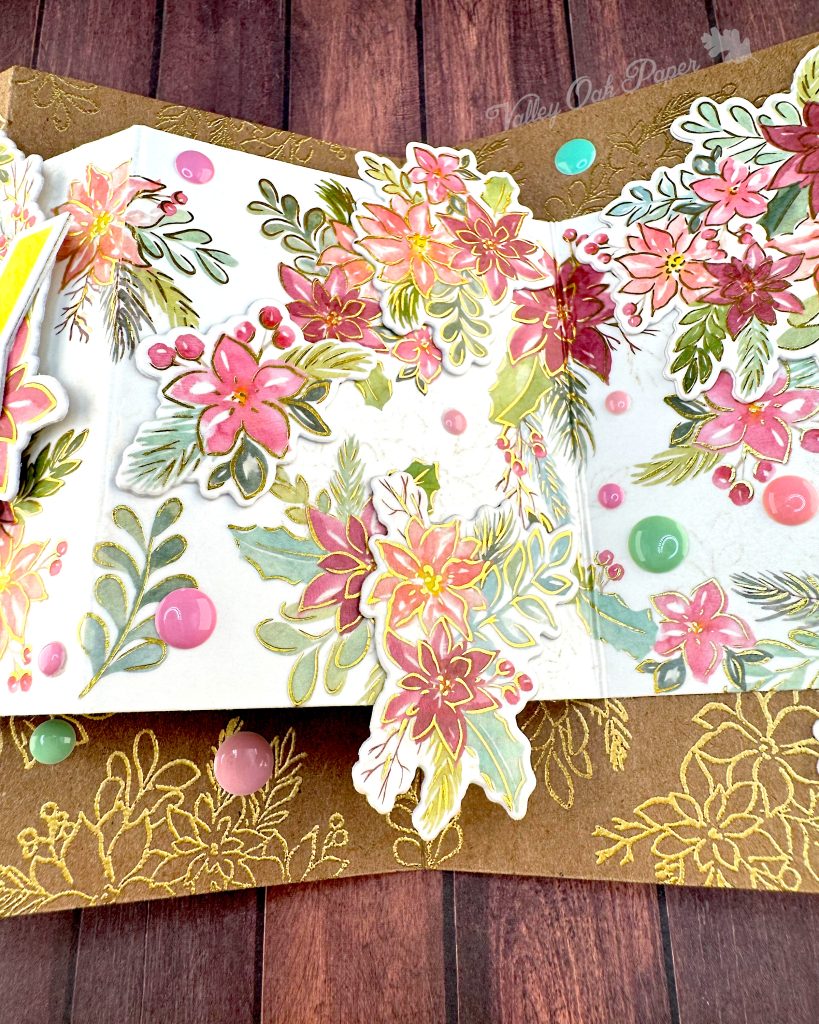
Decorating the Inside
With the sentiment in place, I can decorate the inside of the card. I’m adding floral clusters that stick up or down from the small panel. But they can’t go over the folds.
If you’re adding clusters to the middle panel, they have to be glued only to that panel. If you glue it to the background, your card won’t close any more.
This is what the card looks like now. I had one floral arrangement left over, so I stuck it to the back on the panel for my personal message.
Finale
Off camera I went to town with various Pinkfresh enamel dots from my stash. Mostly pink and green to go with the Poinsettia florals. So this is the final card. I’m loving how the gold catches the light and all the muted pinks and greens! This is such a pretty collection!
Don’t forget to check out the other video hop participants. They’re all getting out of their comfort zones, so it’s promising to be a diverse set of videos.
Pinkfresh Studio Washi Tapes with Coordinating Products
