Creating the card
I created two cards, but for simplicity’s sake this tutorial assumes that you’re only making one.
Slimline cards vary in size, but are generally 8-8.5” by 3-3.5”. They fit into a standard business envelope. My size was determined by the die set I used for the main motif. It’s 8.4 by 3.4”, so I made my card 8.5 by 3.5”.
To accomplish that, I put a letter-sized sheet of vellum in my cutter in landscape orientation and cut it at 7”. Then I scored it at 3.5” and folded it in half.
Adhering vellum
Vellum is tricky, because glue will show through it. There are a couple of different strategies for getting around this.
-
Cover up the back: This is what I use in this tutorial. It works best for symmetrical shapes.
-
Wrap around the back: Make the vellum larger than the area it’s supposed to cover and wrap it around another card element. You can then adhere it on the back.
-
Glue under non-vellum elements. Adhere the vellum under die cuts, e.g. sentiments
-
All-over glue. Use an adhesive sheet or Xyron to stick the vellum down all over the surface.
What to do with scraps
You’ll also be left with a piece that’s 8.5” by 4”, which you can use as a card front or for die cutting from.
If you don’t already have a way of storing your usable scraps, that’s something to invest in. You can buy plastic job ticket folders and separate them by color. That’s what Jennifer McGuire does.
But I just have a big box. If you use 12 by 12 scrapbook papers, it’s important that the box is at least 12” in one direction. I dig through my box regularly and particularly before cutting into whole sheets of expensive specialty papers. If your scraps box gets overly full, you’ll find lots of ideas on YouTube or Pinterest for projects to use them up.
The big box full of paper is also useful for flattening things. I’m often happily surprised when I move my box and discover forgotten treasures under it. 😂
Cutting list
Main motif
-
1 x green cardstock
-
1 x make an impression on Accent Opaque
Flowers
-
Pink: 3 large, 3 small
-
Yellow: 2 large, 4 small
Sentiment
-
2 x Accent Opaque
Sentiment shadow
-
1 x foam
Slimline matting
-
2 x in Accent Opaque
To make an impression, follow your die cutting machine’s instructions for making an impression with a die. This piece of cardstock will cover the inside front of the card. If you hesitate to create an impression, you can instead trace the outline of the die. It may not be quite as polished, but it will still serve to hide the glue and coloring when you open the card.
Die cutting
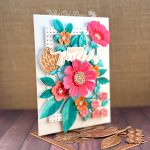
The main motif is a Spellbinders Large Die of the Month from last year. It’s called Kaleidoscope Floral Slimline and it’s on sale right now.
The colored cardstock is from a brand that no longer exists. Here’s a well-reviewed alternative and a fun, gradient version. Glitter cardstock varies widely in how easy it is to die cut. Some also sheds like crazy and you end up with glitter all over yourself, your home and pets. While it’s not dangerous, it gets old quickly. Read the reviews carefully.
The sentiment is also Spellbinders Large Die of the Month but it’s from two years ago. It’s called Just a Tweet and it’s half price right now! If you follow me on Mastodon, you may have noticed the Mother’s Day shaker cards decorated with a bird that I’ve been selling. The bird comes from this die set. It also includes some flowers and musical notes.
Front of the card
I started assembling the card by stacking the green and white main motif die cuts together and adhering them to the front of the card.
To color vellum you use alcohol markers and color the back of the motif. I used a set from Altenew with green, yellow and pink markers. I colored on the inside front of the card. With the darkest green I colored in all the negative spaces first. Then I colored the pineapple shapes with two yellow colors, the leaves with two greens and the large flowers with three pinks. The effect is a bit like watercolors. It’s definitely not for people who enjoy precision in coloring.
The inside of the front looked messy with glue showing through and messy coloring. To cover it up, I fussy cut the shape from the embossed die cut. I adhered it face down to the inside of the front of the card. This way it looks presentable when you open the card. If you fussy cut the outline without embossing, make sure that you don’t get any glue outside the front die cut, because it will show on the front of the card.
Then I stacked and glued down the sentiment. Finally I added the writing surface to the inside of the card and a matching mat on the very back of the card.
Envelopes
I created the envelopes out of scrapbook paper, using my We-R Makers Envelope Punch Board. Once you get the hang of it, it’s really easy to use. I suggest you do a practice run or two with paper you don’t like. Kristina Werner has a great video about envelopes that includes a demo of this punch board. In addition to the punch board, you’ll need a paper trimmer.
Start by folding out the left side of the punch board to find out how big your paper needs to be. For a card that is 8.5 by 3.5”, it needs to be 9.75” square. That means you need to use a 12 by 12 paper, because letter sized paper is only 8.5” wide. Cut your paper into a 9.75” square and decide which side you want on the outside. My paper is pretty light, so I’m using the pretty side out.
Fold out the scoreline extender on the bottom right of the punch board. Place your paper in the punch with the outside of the envelope facing you. Go back to the left fold-out and find out your starting point. Spoiler: It’s 3.125”
Place the left edge of your paper at 3.125″”. Push the big button, and, taking care not to move the paper, score a line in the envelope score line A on your right.
Turn your paper counter-clockwise and line up the already-scored line with the left score groove. Push the button and score the envelope at score line A. Repeat until all four sides are punched and scored. Then you can put away the punch board.
The resulting envelope won’t close because the long flaps are too big. Let’s fix that. Get out your trimmer and place your envelope vertically in the trimmer. Align the long right hand side score line with 3” and cut. Turn the envelope 180 degrees and repeat. Now you can close the envelope. Fold your envelope, using a bone folder for sharp creases.
Time for glue. Place the envelope in landscape format in front of you and fold out the long flaps. Put glue on the bottom half of the outside small flaps. This is going to be easier if you have some way of holding the small flaps down while you do it. Place the bottom long flap on top of the small flaps and let the glue do its thing. Check that you can still get a piece of cardstock all the way down inside the envelope.
If you’re not using the envelope right away, you can put double-sided tape on the inside top flap.


